Prepare a mission means program a Button for the next data collection.
3 methods are possible :
- Direct missionning.
- Relaunching an existing mission.
- Missionning using profiles.
The parameters vary according to the type of Button. That is why you first have to place the Thermo Button on the reader for a direct missioning.
Direct missionning

Click « Mission », and then « Prepare ».
Tab “General”
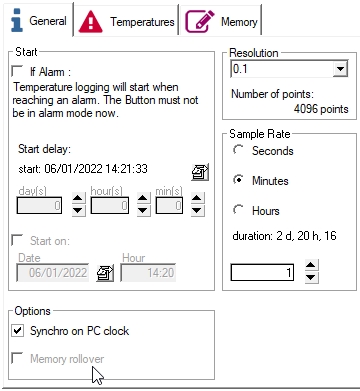
- Start if Alarm (not with 21G model) : the button can start logging only once the high or low temperature threshold you specify is reached. This option can be used also with the start delay.
Warning, your Button must not be in alarm mode at the time you mission it or when the start delay is finished.
- Start delay : you can prepare a mission 45 days in advance (99 days for 22 L ant T) Use the arrows or choose a date using the calendar. You can also click the calendar to select the date of mission start.
- Start at : you can chose the date and time for the mission start.
- Resolution : it can be 0.5°C or 0.1°C depending the models. A higher resolution will affect the number of measurement the button can log and the time before the memory on the button is full. These two values are automatically calculated when you change the resolution.
- Sample rate : choose the frequency used for each measurement. Use the arrow on the right side to increase or decrease the value. This also affects the duration of the mission.
- Synchro on PC Clock : you can adjust the clock of the Button with your PC clock.
- Memory rollover : the button can log from 2048 to 8192 measurements depending on the model. When the memory is full, you have two possibilities :
- You stop the button by answering No and in that case, you will keep all data.
- You allow the rollover by answering Yes and in that case the next point will overwrite the first one and so on. You will then keep a time window corresponding which duration is function of the sample rate and resolution chosen before (see table ‘Mission duration’).
Tab “Temperatures”
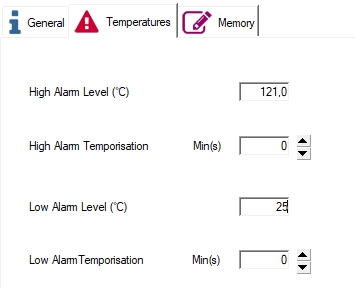
You can specify high and low temperature thresholds. In case the temperature exceeds these thresholds, an alarm will be logged. Enter these limits here.
You can also specify a temporization for these alarms. If you enter a temporization, the alarm will be of different colour :
- Either YELLOW, if the temperature is outside the limit, but during less time than the temperorization
- Or RED, if the temperature is outside the limit, and during more time than the temporisation.
Tab ” Memory “
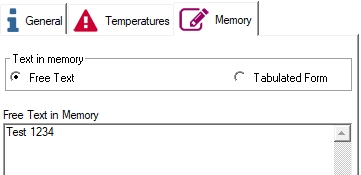
The button has a memory in which you can store information you want to assign to the mission. This information will be displayed when reading the button. It can be a lot number, a vehicle ID, etc.
The information that you enter in this tab can also be used to create automatic archive names when reading the Button.
You can enter this information either in « free text » or using a « tabulated form ».
- Free text : enter the information directly.
- Tabulated form : you have two columns: Variable and « value ». Example: column Variable = Vehicle and column Value = Renault Only the first line will be taken into consideration when creating automatic archive name.
Warning : If you change one single parameter and click « Mission », all the values contained in the Button memory will be definitely erased. If you want to keep these values, “Download” and “Archive” first.
Relaunch a mission
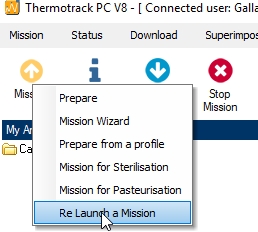
You can relaunch the mission of a Button. In this case, you don’t have to enter all the mission parameters again. Click right the Mission icon and choose “Relaunch mission”.
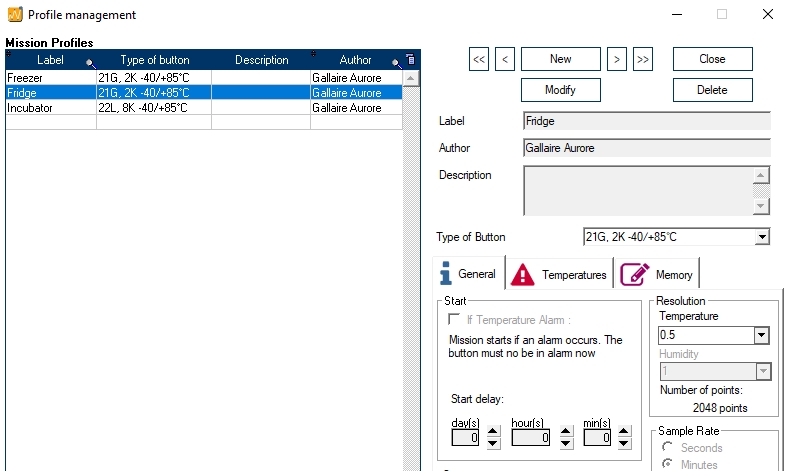
Mission using a Profile
You create a mission profile to keep the parameters and mission your Thermo Buttons quickly and easily.
You have to create your different profiles beforehand.
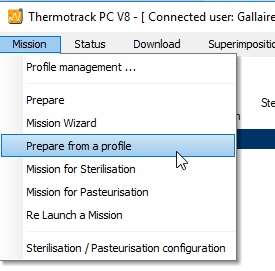
When your profile is created, just click right the « Mission » icon and choose « Prepare from a profile ». Then, choose a profile in the list; and just click the arrow to copy the profile parameters.
Create a new Profile
Click the button ‘New ‘and enter a profile name, an author and a comment.
Then choose the Type of Button, which this profile will use (21G, 22L, 22T,). This will activate some function specific to some buttons.
In each of the three tabs, enter the values (start conditions, sample rate, thresholds, etc). Then, click “Save”.